Designing is the first step in the manufacturing process of plastic components. No doubt, injection mold design largely affects the company’s profitability, productivity, and competitive positioning. Decades back when I got myself enrolled for a course in injection mold design, I had no lifeline for creating a mental picture of how we optimize part design, tooling cost, and lead time, optimizing part functionality, and the primary aim to ensure the designer’s capability marries with the manufacturer’s requirement.
Steps to Design Injection Molds
Here is the structured stepwise approach to design injection molds efficiently.
1. Begin with the Part Design (Design Injection Molds)
Before anything else, the part has to be moldable. If you think in a design injection-molded-parts way of thinking, you will think about how to make it manufacturable from the get-go. Some basics:
Avoid uneven walls:
- Uniform wall thickness: Do not design thick sections, as these cause sinks and warpage.
- Draft and radii: Provide draft angles (typically 1-3°) for easy ejection, use radii where possible, and avoid sharp corners.
- Ribbing, boss design, and transitions: Use ribs to reinforce thin walls; make sure transitions are smooth for good flow in the mold.
2. Choose Material and Review Shrinkage & Flow
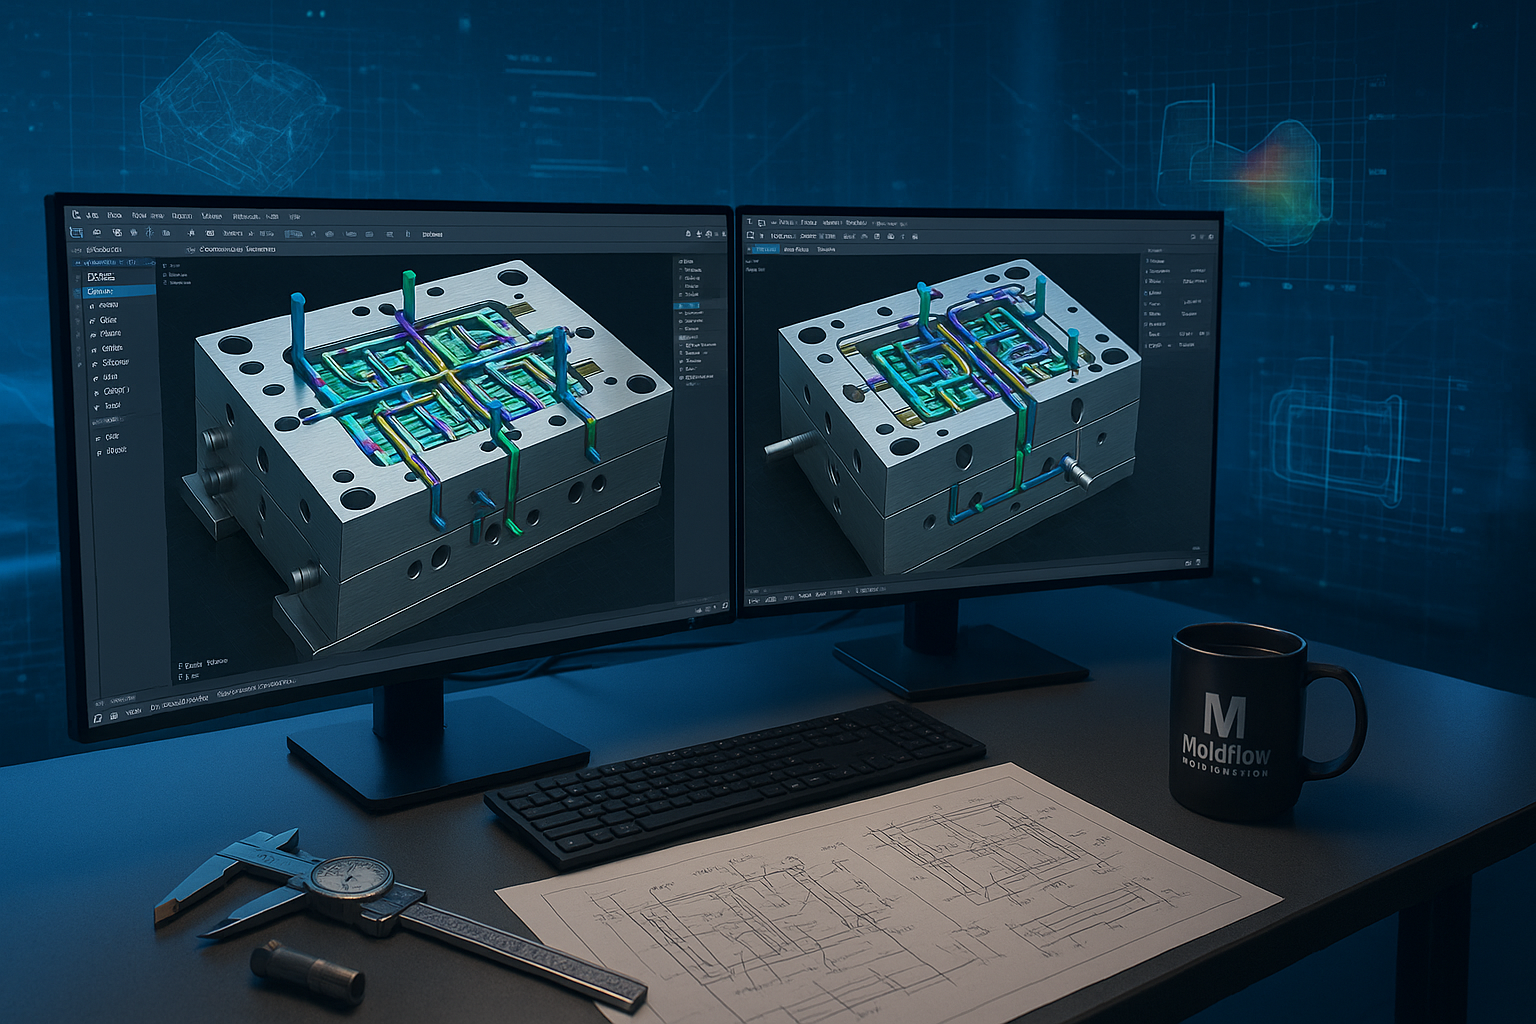
This is critical. You’ll want to be sure you’ve chosen the right plastic resin for the job, and during your injection molding design, consider any shrinkage allowances, flow characteristics, and temperature/pressure requirements. A good injection mold designer will have factored all this into their sizing of cavity/core, cooling channels, and gating.
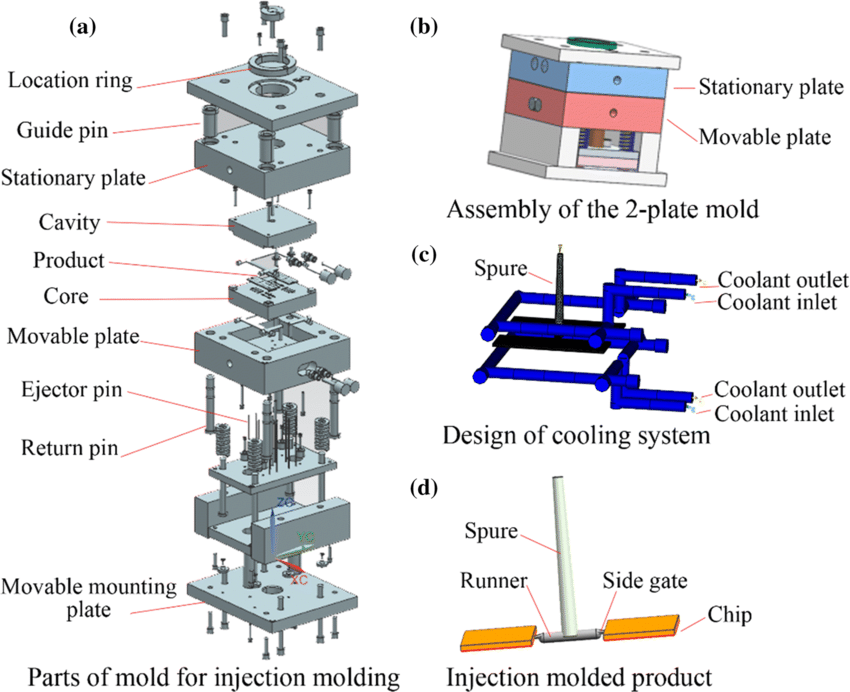
3. Mold configuration & cavity layout
Mold type (two-plate, three-plate, hot runner vs. cold runner) as well as number of cavities and family mold vs. multi-cavity all depend on the tool design & layout, which will decide your cost, cycle time, and logistics.
Key aspects:
- Cavity vs. core: Determine what you want to put in which half.
- Parting line: Choose a location that minimizes flash and makes ejection easy.
- Number of cavities: More cavities increase output but add on to complexity.
- Hot runner vs. cold runner: Decide based on waste, cycle time, and cost.
4. Gate Design & Runner System (Design Injection Molds)
You also need to determine how the molten plastic will enter the cavity in your injection mold design. The gate type and runner geometry influence flow, cooling, and part cosmetics.
- Gate location: The gate should fill the thickest section first and then flow into the thinner sections of the part.
- Runner design: It will be very important to have a balanced flow of material going into each cavity.
- Vestige minimization: Cosmetic considerations.
- Hot runner system: May improve cycle time and reduce waste.
Example: Designing a Simple Plastic Housing
So that you know how to design injection molds, we will run through the design of an injection mold for a plastic housing actually used in electronic devices or a small suitcase. We will see how an industrial designer first develops its full assembly drawing, including exploded view, parts list, and all required section views so as to correctly visualize this plastic housing part after having designed it for injection molding.
1️⃣ Step 1: Product Requirement Understanding
Every design injection mold project starts with the final product function and performance requirements understanding. For the plastic housing, we needed to design:
- Durable structure that could be produced in lightweight ABS plastic.
- Good impact resistance and heat stability.
- Smooth outer surface for labeling and painting.
- Snap-fit joints for engagement with a mating cover.
2️⃣ Step 2: Plastic Part Design for Injection Molding
At this stage, everything that has been stated before is applicable:
- Uniform Wall Thickness: The housing was designed with 2.5 mm walls to ensure uniform flow while cooling.
- Draft Angles: 2° draft is provided on all vertical faces for easy ejection and to prevent any scratches during ejection.
- Ribs & Bosses: Internal ribs are included for extra strength; without the need to thicken walls, bosses are used to support screws and snaps.
- Fillets & Radii: All sharp corners are rounded off to improve melt flow and reduce stress concentration.
3️⃣ Step 3: Selecting Mold Configuration
The mold is either a cold runner system or a hot runner system. After you’ve finalized your part, the next thing to do in injection molding tool design is to make sure you pick the right mold configuration.
For this product:
- A two-plate mold was chosen (simpler and cost-effective).
- A single cavity was used to prototype; a multi-cavity will be in place for mass production.
- The parting line was put at the midsection wherever possible except for a few cases to avoid difficult geometry, flash, and easier ejection.
- Initially a cold runner was used, and later in the production mold we upgraded to a hot runner for waste reduction and improved cycle time.
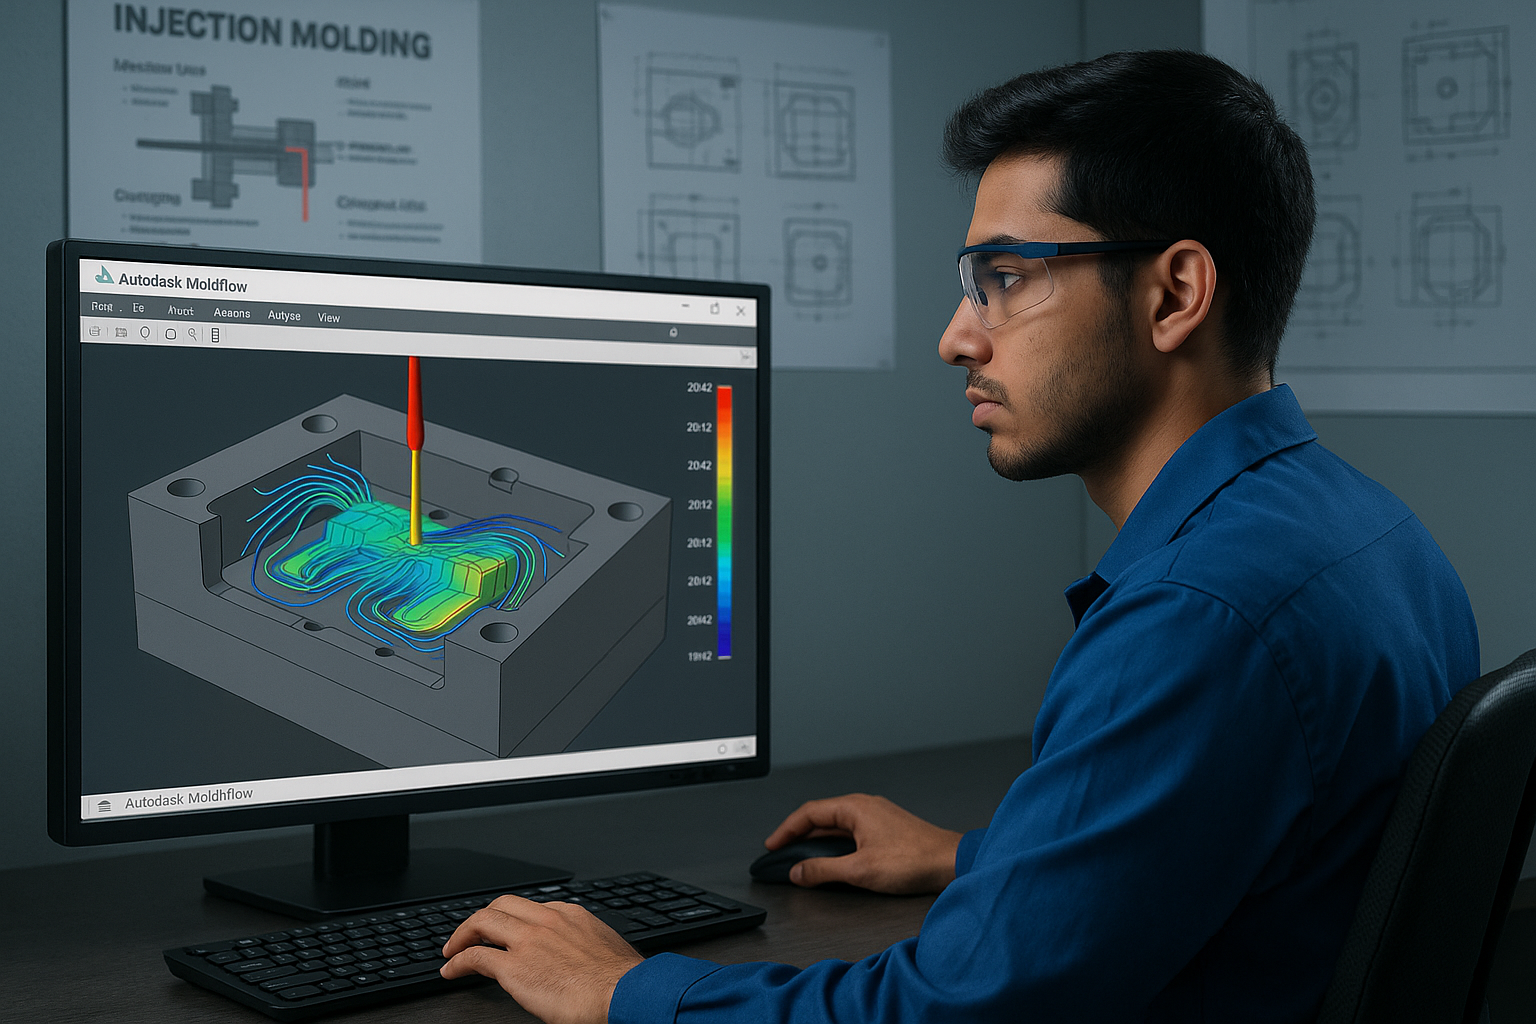
4️⃣ Step 4: Gate & Runner Design
Gate and runner design are the lifelines of any injection mold design. The mold injection design needs to allow for smooth and balanced molten plastic flow into the cavity. In our design we used plastic injection molding:
- A submarine gate was used to automatically shear off after molding.
- The gate was placed strategically near the thicker boss region, allowing melt to fill thin sections last.
- Runners were balanced and tapered for consistent pressure distribution.
- Proper gate size ensured no jetting or hesitation marks on visible surfaces.
Conclusion
Designing injection molds is a combination of science and art, where creativity, experience, knowledge of mold flow analysis, and various mold design techniques are required. The outcome of the injection molding tool design has a huge impact on part quality, cycle time, and overall productivity.
Injection mold design guidelines for beginners typically come in two parts: one being that there are basic parameter settings that apply to all injection molding processes regardless of which polymer is used (read more here), and the other being specific recommendations for some commonly used polymers.
In our design injection mold example, an optimized plastic injection mold design is developed by considering wall thickness, gating, draft, and material arrangement. This kind of systematic approach in mold injection design gives rise to high production yield, minimum mold manufacturing cost, and optimized product performance within the variations.
Designing for injection molding isn’t just about designing molds but designing smarter and better products as well in terms of mechanical properties and cost. Once you learn the principles as I did throughout my 14 years experience, you will be able to design good-quality products in any industry—automotive, electronics, medical, consumer-based products, etc.


0 Comments